Showing posts with label Mix It Up Monday. Show all posts

Monday, April 10, 2017

Mix It Up Monday: Salt Background

Today on the blog at Paper Issues we are all about mixing it up with mixed media.  Orange Gearle is challenging us to try salt with your watercolors or other wet mediums.  Here'e my take using Crate Paper Oasis.


Here are a few close ups to see the salt effect:
I loved playing with Crate Paper Oasis for this summer day at the lake. I always use Crate's chipboard stickers for dimension.  They have the cutest sayings and designs to add to projects.

 Love the Tealightful pink foam glitter Thickers!  Perfect for this summer fun design!


I love Crate Paper's summery Oasis.  It was perfect for this swimming, playing, jumping in the lake kind of a day!

We hope you will Mix It Up, too this month!  Post your projects in the Facebook group for a chance to win!


Monday, March 13, 2017

Mix It Up Monday: March

Hello and Happy Monday!  It is back to work after a week of Spring Break and it sure inspired me to get out some summer pictures!  Today is Mix It Up Monday on the Paper Issues blog.  The challenge for March is to use texture on your page with mixed media.  I opted for texture paste and I loved how Heidi Swapp's pink metallic texture paste was the perfect match for Amy Tangerine's On a Whim pink foil stickers and ephemera!


Layers of On A Whim patterned papers and my fave Amy Tangerine foam phrases Thickers from a past collection.  I started with gesso, then added the texture paste in a circle over the Heidi Swapp stencil.   I overlapped spots to create more texture and pattern.  When that dried at used the packaging technique with watercolors splatters in greens, blues, and lastly the pinks.


I love the pink foil ephemera and stickers.  They really accentuated my picture with my bright pink sweater.  It was documenting an amazing dinner by the river in historic Stillwater, MN.  In the lower part of the layout you can see the tear-away strips from three On A Whim papers which I added stitching to each one.


Thanks for taking a peek today,  I hope your week is off to a grand start.  Here's to hoping Spring is truly around the corner and that here in MN that means this new snow melts quickly!

Don't forget about the online Spring Crop with PI in the Facebook group this week Friday-Sunday.  We can't wait for you to see all of the challenges and join us online!


Monday, February 13, 2017

Mix It Up Monday- XOXO Arrows

Today we are up on the Paper Issues blog for Mix It Up Monday.  This month Orange is challenging us to try embossing with mixed media!
I gathered up my stash of arrow stamps and embossed them before adding watercolors. I also had some floral stamps that I embossed and painted as well!  Love a good watercolor resist project!


The Simple Stories Love & Adore collection is so easy to work with!  I love the colors in it and that pop of yellow is just my favorite! See the embossed arrows peeking in the top corner? They were so much fun to create a pattern with on the top and bottom of the page.


I added watercolor to the chipboard Love in my title.  I love the mix of ephemera, 4x6 stickers, chipboard, and cardstock stickers included in the Love & Adore collection that worked perfectly with this page.


I added the embossed florals at the top corner of the LO and lower corner of my photo.  See the shine of the embossed arrows at the top edge?!  I love the black, shiny glitter embossing with this collection.  I love the paper elements patterned paper for quick strips of paper to add to a LO.  The polka dots paper add that pop of bold color to draw the eye to the photo.


I hope you will mix it up this month and join us on PIFF for a chance to win a PI giftcard.  Embossing on a project is so much fun to try out.  I have used this technique a few times and it is always fun (think crayon resist art as a child!!)  I love the look it creates.

Save 20% on all the things at Paper Issues.  There are soooo many new things calling your name.


Monday, January 9, 2017

Mix it up Monday January

I love to push my messy side on mixed media and love when inspiration hits! 
Here's my take on Mix It Up Monday at Paper Issues.
 I was scrolling Instagram in December and saw this amazing Christmas tree done with green ribbon by Audrey Yeager.  
She mentioned her YouTube process video and ribbon cut file.  
I had the snowy tree pics which honestly is a favorite part of winter in MN.  
I love seeing the trees heavy with fresh snow!
I was super excited to use all of these fun trees, snowflakes, and Brr papers/blue-green paper from Crate Paper Snow and Cocoa.
Lots of pics below to show the process:  Using the tree cut file- added gesso above it. Added acrylic paint in layers using packaging plastic. Then I dried it before adding the white ribbon. Weaved the ribbon through the holes. (I should've watched her video again.  I made mine really full with ribbon as it was hard to know when to stop!!
 Added paint in layers-- added white, yellow, and blue paints--mixed varying shades of green.  I thought I would use the green ribbon in the picture--and then opted for the snowy white!

I threaded through all of the ribbon. I added the splatters of three colors of green mist. I decided the tree looked too messy with the excess green paint on the perimeter, so I added the hand stitching with white thread.
It was so much fun to dig through all of my Crate Paper Snow and Cocoa collection kit for this. I completely love this collection and really didn't get a chance to use much of it yet!
Also, how cute is that B &W mini flair from Feed Your Craft?!  I love it for my date!
 The title was so much fun to mess with and use the trees and snowflakes included on the sticker sheets, ephemera, and Snow and Cocoa chipboard.
 I thought the top edge looked boring so I added scraps and sewed them down.  These little banner pieces from the sticker sheet and cut apart paper worked well!


I hope you are inspired to try something new!  It is the perfect time to stashbust your ribbon, mixed media supplies, or collections of paper you haven't cut into yet!


Monday, December 12, 2016

Mix It up- the Red Cup Edition

Today it is all about mixed media at Paper Issues for a new Mix It Up Monday with Dona!  This month she is challenging us to keep it mainly a gray, black, and white LO with a pop of color. 

I focused on using some of my Elle's Studio Tis the Season items for this layout.

Here's the quick process I did for this mixed media LO:  
 I started out by applying clear gesso on my white cardstock.  I dry it immediately with my heat gun to minimize warping. 
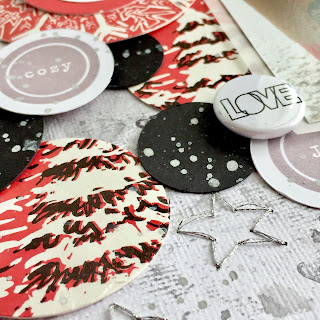
 Next, I applied layers of silver mist from Mr. Huey's and black ColorShine mixed with water for the packaging technique. 
 Then, I added splatters of gray and white watered-down, acrylic paint.  I added splatters of paint on my black cardstock before I cut it into circles.

I stamped my title using the fun Malia alphabet stamps from Elle's Studio.  I cut the Elle's Studio Countdown paper into smaller circles to break up the red and black.

Elle's Studio has such cute acrylic pieces to go along with their collections.  I loved this good cheer piece and how it worked so well to be part of my title.


I used some flair from Feed Your Craft.  I love the black and white love sentiments!


The stitched silver metallic thread stars were fun to sprinkle throughout.  The metallic thread is always a struggle to work with, but I love the results!
I covered up the big green Starbucks logo on the larger cup circle.  It ended up being too distracting!  Elle's Studio Countdown paper to the rescue!!


 One last close up pic!  Thanks for checking out the details on this fun Mix It Up Monday at Paper Issues!  I hope you are inspired to get messy with your projects!

I hope you find some time this holiday season to include some of the details of your December into your projects!  Upcycle a red cup, napkin, ticket stub, business card, receipt, etc...  It is fun to see these items on your projects to compare and reflect back on in a few years!

Get messy and don't forget to stock up with all the fun supplies at Paper Issues.


Monday, October 10, 2016

Mix It Up Monday: Burst Stencil

Today it all kinds of fun, it's Paper Issues Mix It Up Monday with Orange Gearle and she is challenging us to use stencils with our projects.  I have been loving the colors in Pinkfresh Studios Indigo Hills and couldn't wait to use my distress inks with a 12 x 12 Heidi Swapp stencil to make this burst layout.
Ryan found this "tunnel" during his brother's football game.  He kept running through it as though he was a pro football player coming through the tunnel yelling with all of his might!  I started by adding gesso to the background.  I then layered the stencil with the distress inks.
After everything was dry, I used the stencil to trace the solid parts onto the Pinkfresh papers.  I love the indigo blue Blue Valley papers and gold pops in the Pinnacle paper.
I then added stitching in blue and gold to the border of the beams and lifted the edges up.  This created a cool dimension and movement that I wanted to accompany this action picture.
It is pretty much a favorite of mine to get the machine stitching on my pages.  I bet my mother never thought I'd use the machine she gave me, let alone dream I'd be stitching on paper!! 

I also used the free cut file from Paper Issues Cut it Up October and used the arrow negative pieces from it.  
I love the two alphas that are part of the Indigo Hills collection.  The leather style mini alphas with blue splatters and then the blue puffy alphas for the main words in the title.  I can't wait to see how you use your stencils in your projects this month!  Join us on Facebook to show us what you are inspired to make!  You can find these Pinkfresh items in the Paper Issues store and so much more.  Save 20% with code: Stacie


Monday, September 12, 2016

Mix It Up Monday

It's Mix it Up Monday on the Paper Issues blog.  Orange always has a great idea to spark the mixed media challenge.  This month it's all about using scraps or creating mixed media and then punching shapes or borders out from it to add texture and depth to your pages or background!  
Here's the process I used for this project.  I started with two 12x12 white cardstock papers.  I added gesso all over one and on the second one, I just added gesso to the middle of the page.

  I used the packaging technique to layer the watercolors and added splats.  Next, I started the background page.  I did the straw blowing on opposite sides of the paper to ensure that most was dry before adding more watercolors nearby. That keeps it from getting muddy looking with too many colors blending.  I kept working inward to the yellow and green.  As it dried, I layered more paint and used the straw to add more lines of paint in both directions.
My preschooler loves dressing up or being silly. He modeled these star glasses this summer.  He definitely knows how to make me smile!  Who says Crate Paper's Cute Girl has to be just for girls??  I had fun making it work for a boy page! The last step was punching out all of the stars grouping them by color, and sewing them down!
 As always get your hands on all the cute things at Paper Issues store.  If you use my code: Stacie you will get 20% off your order.  Thanks for looking!